Friday, 4 October 2019

Ethical Hacking - Process

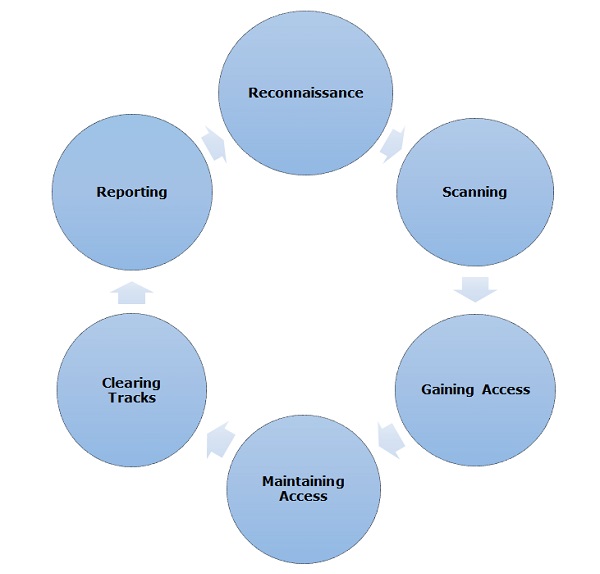
Like all good projects, ethical hacking too has a set of distinct phases. It helps hackers to make a structured ethical hacking attack.
Different security training manuals explain the process of ethical hacking in different ways, but for me as a Certified Ethical Hacker, the entire process can be categorized into the following six phases.
Ethical Hacking Process

Reconnaissance

Reconnaissance is the phase where the attacker gathers information about a target using active or passive means. The tools that are widely used in this process are NMAP, Hping, Maltego, and Google Dorks.

Scanning

In this process, the attacker begins to actively probe a target machine or network for vulnerabilities that can be exploited. The tools used in this process are Nessus, Nexpose, and NMAP.

Gaining Access

In this process, the vulnerability is located and you attempt to exploit it in order to enter into the system. The primary tool that is used in this process is Metasploit.

Maintaining Access

It is the process where the hacker has already gained access into a system. After gaining access, the hacker installs some backdoors in order to enter into the system when he needs access in this owned system in future. Metasploit is the preferred tool in this process.

Clearing Tracks

This process is actually an unethical activity. It has to do with the deletion of logs of all the activities that take place during the hacking process.

Reporting

Reporting is the last step of finishing the ethical hacking process. Here the Ethical Hacker compiles a report with his findings and the job that was done such as the tools used, the success rate, vulnerabilities found, and the exploit processes.

Quick Tip

The processes are not standard. You can adopt a set of different processes and tools according to your techniques that you are comfortable with. The process is of least significance as long as you are able to get the desired results.

Thursday, 3 October 2019

Ethical Hacking - Tools

In this chapter, we will discuss in brief some of famous tools that are widely used to prevent hacking and getting unauthorized access to a computer or network system.

NMAP

Nmap stands for Network Mapper. It is an open source tool that is used widely for network discovery and security auditing. Nmap was originally designed to scan large networks, but it can work equally well for single hosts. Network administrators also find it useful for tasks such as network inventory, managing service upgrade schedules, and monitoring host or service uptime.
Nmap uses raw IP packets to determine −
  • what hosts are available on the network,
  • what services those hosts are offering,
  • what operating systems they are running on,
  • what type of firewalls are in use, and other such characteristics.
Nmap runs on all major computer operating systems such as Windows, Mac OS X, and Linux.

Metasploit

Metasploit is one of the most powerful exploit tools. It’s a product of Rapid7 and most of its resources can be found at: www.metasploit.com. It comes in two versions − commercial and free edition. Matasploit can be used with command prompt or with Web UI.
With Metasploit, you can perform the following operations −
  • Conduct basic penetration tests on small networks
  • Run spot checks on the exploitability of vulnerabilities
  • Discover the network or import scan data
  • Browse exploit modules and run individual exploits on hosts

Burp Suit

Burp Suite is a popular platform that is widely used for performing security testing of web applications. It has various tools that work in collaboration to support the entire testing process, from initial mapping and analysis of an application's attack surface, through to finding and exploiting security vulnerabilities.
Burp is easy to use and provides the administrators full control to combine advanced manual techniques with automation for efficient testing. Burp can be easily configured and it contains features to assist even the most experienced testers with their work.

Angry IP Scanner

Angry IP scanner is a lightweight, cross-platform IP address and port scanner. It can scan IP addresses in any range. It can be freely copied and used anywhere. In order to increase the scanning speed, it uses multithreaded approach, wherein a separate scanning thread is created for each scanned IP address.
Angry IP Scanner simply pings each IP address to check if it’s alive, and then, it resolves its hostname, determines the MAC address, scans ports, etc. The amount of gathered data about each host can be saved to TXT, XML, CSV, or IP-Port list files. With help of plugins, Angry IP Scanner can gather any information about scanned IPs.

Cain & Abel

Cain & Abel is a password recovery tool for Microsoft Operating Systems. It helps in easy recovery of various kinds of passwords by employing any of the following methods −
  • sniffing the network,
  • cracking encrypted passwords using Dictionary, Brute-Force and Cryptanalysis attacks,
  • recording VoIP conversations,
  • decoding scrambled passwords,
  • recovering wireless network keys,
  • revealing password boxes,
  • uncovering cached passwords and analyzing routing protocols.
Cain & Abel is a useful tool for security consultants, professional penetration testers and everyone else who plans to use it for ethical reasons.

Ettercap

Ettercap stands for Ethernet Capture. It is a network security tool for Man-in-the-Middle attacks. It features sniffing of live connections, content filtering on the fly and many other interesting tricks. Ettercap has inbuilt features for network and host analysis. It supports active and passive dissection of many protocols.
You can run Ettercap on all the popular operating systems such as Windows, Linux, and Mac OS X.

EtherPeek

EtherPeek is a wonderful tool that simplifies network analysis in a multiprotocol heterogeneous network environment. EtherPeek is a small tool (less than 2 MB) that can be easily installed in a matter of few minutes.
EtherPeek proactively sniffs traffic packets on a network. By default, EtherPeek supports protocols such as AppleTalk, IP, IP Address Resolution Protocol (ARP), NetWare, TCP, UDP, NetBEUI, and NBT packets.

SuperScan

SuperScan is a powerful tool for network administrators to scan TCP ports and resolve hostnames. It has a user friendly interface that you can use to −
  • Perform ping scans and port scans using any IP range.
  • Scan any port range from a built-in list or any given range.
  • View responses from connected hosts.
  • Modify the port list and port descriptions using the built in editor.
  • Merge port lists to build new ones.
  • Connect to any discovered open port.
  • Assign a custom helper application to any port.

QualysGuard

QualysGuard is an integrated suite of tools that can be utilized to simplify security operations and lower the cost of compliance. It delivers critical security intelligence on demand and automates the full spectrum of auditing, compliance and protection for IT systems and web applications.
QualysGuard includes a set of tools that can monitor, detect, and protect your global network.

WebInspect

WebInspect is a web application security assessment tool that helps identify known and unknown vulnerabilities within the Web application layer.
It can also help check that a Web server is configured properly, and attempts common web attacks such as parameter injection, cross-site scripting, directory traversal, and more.

LC4

LC4 was formerly known as L0phtCrack. It is a password auditing and recovery application. It is used to test password strength and sometimes to recover lost Microsoft Windows passwords, by using dictionary, brute-force, and hybrid attacks.
LC4 recovers Windows user account passwords to streamline migration of users to another authentication system or to access accounts whose passwords are lost.

LANguard Network Security Scanner

LANguard Network Scanner monitors a network by scanning connected machines and providing information about each node. You can obtain information about each individual operating system.
It can also detect registry issues and have a report set up in HTML format. For each computer, you can list the netbios name table, current logged-on user, and Mac address.

Network Stumbler

Network stumbler is a WiFi scanner and monitoring tool for Windows. It allows network professionals to detect WLANs. It is widely used by networking enthusiasts and hackers because it helps you find non-broadcasting wireless networks.
Network Stumbler can be used to verify if a network is well configured, its signal strength or coverage, and detect interference between one or more wireless networks. It can also be used to non-authorized connections.

ToneLoc

ToneLoc stands for Tone Locator. It was a popular war dialling computer program written for MS-DOS in the early 90’s. War dialling is a technique of using a modem to automatically scan a list of telephone numbers, usually dialling every number in a local area code.
Malicious hackers use the resulting lists in breaching computer security - for guessing user accounts, or locating modems that might provide an entry-point into computer or other electronic systems.
It can be used by security personnel to detect unauthorized devices on a company’s telephone network.
Ethical Hacking - SQL Injection

SQL injection is a set of SQL commands that are placed in a URL string or in data structures in order to retrieve a response that we want from the databases that are connected with the web applications. This type of attacks generally takes place on webpages developed using PHP or ASP.NET.
An SQL injection attack can be done with the following intentions −
  • To dump the whole database of a system,
  • To modify the content of the databases, or
  • To perform different queries that are not allowed by the application.
This type of attack works when the applications don’t validate the inputs properly, before passing them to an SQL statement. Injections are normally placed put in address bars, search fields, or data fields.
The easiest way to detect if a web application is vulnerable to an SQL injection attack is to use the " ‘ " character in a string and see if you get any error.

Example 1

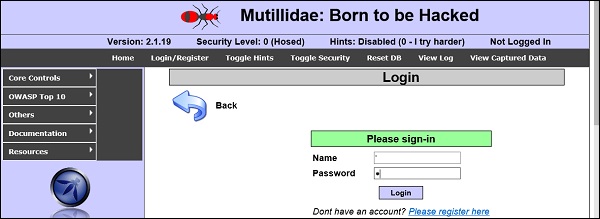
Let’s try to understand this concept using a few examples. As shown in the following screenshot, we have used a " ‘ " character in the Name field.
Name Field
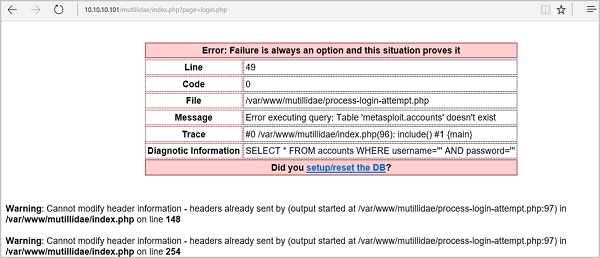
Now, click the Login button. It should produce the following response −
Login
It means that the “Name” field is vulnerable to SQL injection.

Example 2

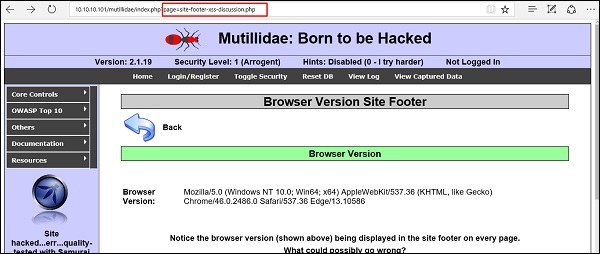
We have this URL − http://10.10.10.101/mutillidae/index.php?page=site-footer-xssdiscussion.php
And we want to test the variable “page” but observe how we have injected a " ‘ " character in the string URL.
Variable Page
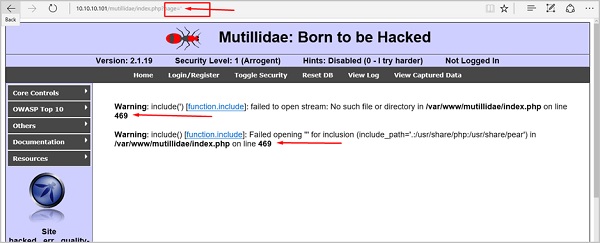
When we press Enter, it will produce the following result which is with errors.
Result With Errors

SQLMAP

SQLMAP is one of the best tools available to detect SQL injections. It can be downloaded from http://sqlmap.org/
It comes pre-compiled in the Kali distribution. You can locate it at − Applications → Database Assessment → Sqlmap.
After opening SQLMAP, we go to the page that we have the SQL injection and then get the header request. From the header, we run the following command in SQL −
./sqlmap.py --headers="User-Agent: Mozilla/5.0 (X11; Ubuntu; Linux i686; rv:25.0) 
Gecko/20100101 Firefox/25.0" --cookie="security=low;
PHPSESSID=oikbs8qcic2omf5gnd09kihsm7" -u '
http://localhost/dvwa/vulnerabilities/sqli_blind/?id=1&Submit=Submit#' -
level=5 risk=3 -p id --suffix="-BR" -v3
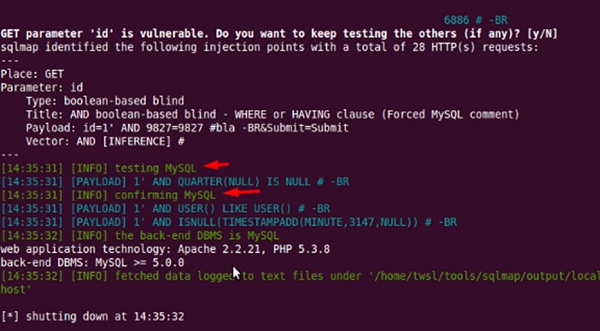
The SQLMAP will test all the variables and the result will show that the parameter “id” is vulnerable, as shown in the following screenshot.
SQL Map

SQLNinja

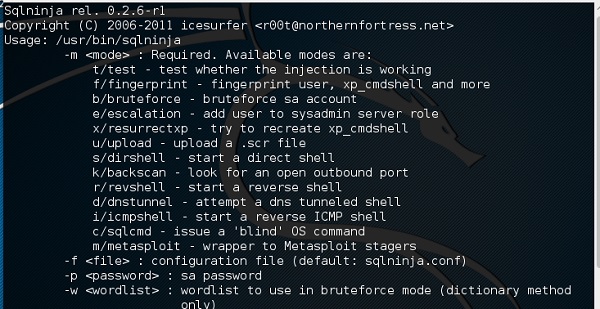
SQLNinja is another SQL injection tool that is available in Kali distribution.
SQLninja

JSQL Injection

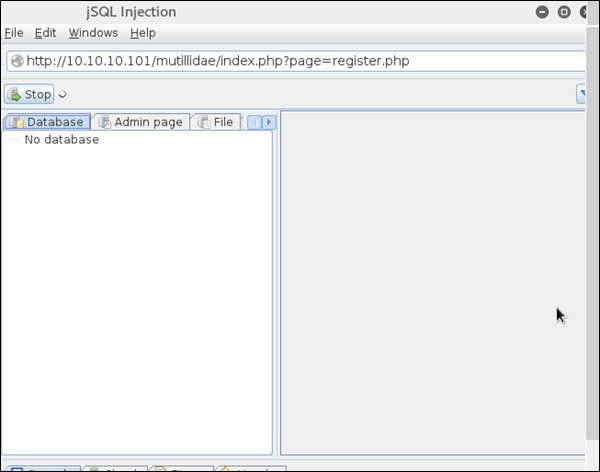
JSQL Injection is in Java and it makes automated SQL injections.
JSQL Injection

Quick Tips

To prevent your web application from SQL injection attacks, you should keep the following points in mind −
  • Unchecked user-input to database should not be allowed to pass through the application GUI.
  • Every variable that passes into the application should be sanitized and validated.
  • The user input which is passed into the database should be quoted.

Sunday, 20 January 2019


Monday, 24 September 2018

Securing Network Traffic With SSH Tunnels

Introduction to SSH Tunnels

Secure Shell, or SSH, is used to create a secure channel between a local and remote computer. While SSH is commonly used for secure terminal access and file transfers, it can also be used to create a secure tunnel between computers for forwarding other network connections that are not normally encrypted. SSH tunnels are also useful for allowing outside access to internal network resources.
To create an SSH tunnel, you need:
  • Target server offering network services (http, vnc, etc.) to the client
  • SSH server listening for connections from the client
  • SSH client configured to forward traffic from a local listening port, through the SSH server, to the target server
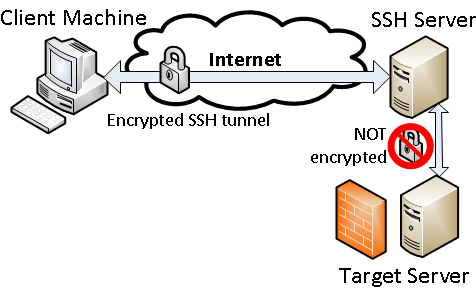
The SSH server may be running on the same machine as the target server, or on a different machine. Network communications between the SSH server and the target server are NOT encrpyted by the SSH tunnel (see diagram below), so if the servers are running on different machines, ideally they should be located together on a secure network.
SSH Tunnel Diagram
Configuring an SSH server(link is external) is beyond the scope of this article, but popular options include OpenSSH(link is external) for unix-based systems and Bitvise SSH Server(link is external) for Windows. The SSH server will need to have access to the listening port on the target server. Common SSH clients(link is external) include OpenSSH(link is external) and PuTTY for Windows(link is external).

Scenario - Connecting to an insecure service

In this scenario, a client wishes to connect to a service that does not natively use encryption, but does not want the traffic to be sent unencrypted through the Internet. The environment for this scenario:
  • Target server: VNC service is listening on port 5900 at IP address 1.2.3.4
  • SSH server: SSH service is listening on port 22 at IP address 1.2.3.5
  • Client machine: SSH and VNC clients installed

Creating the SSH tunnel using PuTTY:

  1. Open the PuTTY client user interface
  2. In the Session window, under "Basic options for your PuTTY session", enter the IP address and listening port for the SSH server:
    PuTTY SSH client
  3. In the left-pane, select Connection->SSH->Tunnel
  4. Under "Options controlling SSH port forwarding", enter the following settings (see screen shot):
    • Source port: Pick an arbitrary port not in use on your client, the example uses 15900.
    • Destination: IP address and listening port for the target server, 1.2.3.4:5900
    • Leave "Local" and "Auto" radio buttons selected
  5. Click "Add" to save these settings
  6. Click "Open" to create the SSH tunnel. Enter your username and password for the SSH server when prompted.
PuTTY SSH client

Creating the SSH tunnel using OpenSSH:

The following command can be used to create the SSH tunnels using the OpenSSH client:
ssh -L 15900:1.2.3.4:5900 1.2.3.5 -N
The option 15900:1.2.3.4:5900 specifies the local port, 15900, to be forwarded to the remote port, 5900, on the target server, 1.2.3.4. The local port can be any arbitary port not in use on the client. Enter your SSH username and password when prompted, unless you have configured your SSH server for public key authentication.

Connecting to the service through the tunnel:

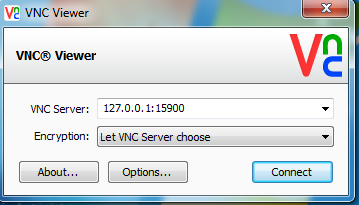
To connect to the service on the target server, configure your client to connect to the client machine using the local listening port defined in the SSH tunnel configuration. Use the local loopback address, 127.0.0.1 (see screen shot). Traffic will be forwarded through the SSH tunnel to the target server.
VNC

Alternative -- use a client that natively supports SSH tunnels:

Some clients for unecrypted network services, such as FTP, VNC, etc., natively  support connections using SSH tunnels. In this case, there is no need to manually create the SSH tunnel using an SSH client such as OpenSSH or PuTTY. Just enter the SSH server information directly into the VNC client supporting SSH tunnels. This screen shot example uses the TightVNC client:
TightVNC
While the example above demonstrates SSH tunnels for VNC, a popular service often configured without requiring encryption, these same settings can be used to conenct to other network services when replacement with an alternative that supports encyrption natively is not an option.

SQL Injection vulnerability email notification from security@berkeley.edu

Security Contacts that receive a SQL Injection vulnerability notice are responsible for identifying and notifying any stakeholders about the SQL Injection attack including functional owners, developers, system administrators, and database administrators in order to determine the vulnerable and potentially compromised resources.
Immediate action must be taken to address any confirmed SQL Injection flaws discovered:
  • Once a person responsible for coordinating remediation is identified, please respond to the notice so that Information Security and Policy can work directly with the coordinator to ensure full remediation
  • Coordinate an investigation of potentially vulnerable web pages and resources amongst developers or other stakeholders
  • A review of web, application, and database logs may reveal the point of vulnerability and source of attacks
  • Develop a plan to remediate any confirmed SQL Injection flaws and prevent future attacks
Additionally, if your system stores, processes, or transmits sensitive data such as Protection Level 1 or Protection Level 2 data as described in the Berkeley Data Classification Standard, you should immediately reply to the security notice (to security@berkeley.edu(link sends e-mail)(link sends e-mail)) and notify the Information Security and Policy office.

How to protect a web site or application from SQL Injection attacks

Developers can prevent SQL Injection vulnerabilities in web applications by utilizing parameterized database queries with bound, typed parameters and careful use of parameterized stored procedures in the database.
This can be accomplished in a variety of programming languages including Java, .NET, PHP, and more.
Please consult the following resources for implementing parameterized database queries and preventing SQL Injection in your code base:
Additionally, developers, system administrators, and database administrators can take further steps to minimize attacks or the impact of successful attacks:
  1. Keep all web application software components including libraries, plug-ins, frameworks, web server software, and database server software up to date with the latest security patches available from vendors.
  2. Utilize the  when provisioning accounts used to connect to the SQL database.  For example, if a web site only needs to retrieve web content from a database using SELECT statements, do not give the web site's database connection credentials other privileges such as INSERT, UPDATE, or DELETE privileges. In many cases, these privileges can be managed using appropriate database roles for accounts.  Never allow your web application to connect to the database with Administrator privileges (the "sa" account on Microsoft SQL Server, for instance).
  3. Do not use shared database accounts between different web sites or applications. 
  4. Validate user-supplied input for expected data types, including input fields like drop-down menus or radio buttons, not just fields that allow users to type in input.
  5. Configure proper error reporting and handling on the web server and in the code so that database error messages are never sent to the client web browser. Attackers can leverage technical details in verbose error messages to adjust their queries for successful exploitation.